Tutorial: Uploading Images Using WordPress
If you plan to put a badge to your sidebar, you may need to follow through these steps first to get your image URL.
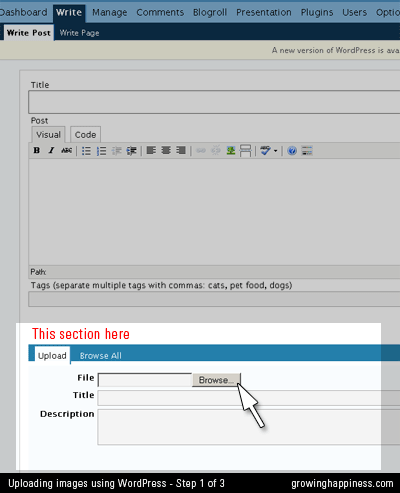
Step 1
Go to a Write Page or Write Post page.
Locate the “Upload” section below.
Select the saved image from your computer, give it a title and description if you want, and click the “Upload” button.
Step 2
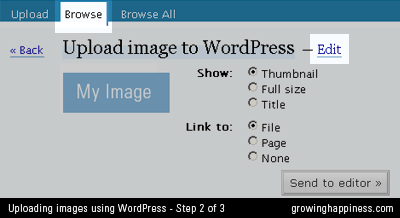
(Usually, if you want to use the image you’ve just uploaded in a post that you’re writing, you’d click “Send to Editor”. In this tutorial, I’m showing you how to get the image URL so that you can use it on your sidebar)
Go to the “Browse” mode, click on “Edit”.
Alternatively click “Browse All”, select the image you want to use, and then click on “Edit”.
Step 3
Copy your image URL from the URL field. Paste it in a Notepad program so that you can use it later.
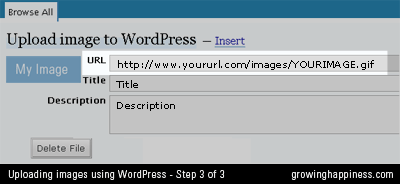
Now you can proceed to use this image in your sidebar by following this tutorial.
Remember you can download a badge from this page.
NaBloPoMo Badges & Tutorials
HTML badges for your blog
Tutorials for adding these badges to your Blogger or WordPress account
NaBloPoMo Badges – March 2008
Badges for April are here
Some badges I created for National Blog Posting Month. Feel free to use them on your blog but please download and save to your server first(do not hotlink). See also instructions and other badges at the NaBloPoMo site.
![]()
![]()
![]()
![]()
![]()
![]()
Tutorials
Adding Badges using Blogger
Adding Badges using WordPress
Tutorial : Adding Badges Using Blogger
Adding images using Blogger can be confusing, even for someone like me so here’s a little tutorial.
Before that
Get your NaBloPoMo badges here
Step 1
Go to your Blogger Dashboard and click on “New Post”.

Step 2
At the Create Posting screen, click on the “Add Image” button, represented by an icon of a landscape (at least I think that’s what it is).

Step 3
Assuming you have saved the badge of choice on your computer, click on the “Browse…” button, locate the saved image on your PC. The file location should be reflected in the text area beside the button once you’ve selected the image.
Then click on the “Upload Image” button. (You will see a Loading page while the image is being uploaded)

Step 4
When upload is complete, you will be presented with a screen saying that “Your image has been added”.
Click “Done” and this window will close.

Step 5
Back at the “Create Posting” page, you will see a chunk of code generated by Blogger. You can title this post and save if you want (just in case you accidentally delete the code in the process of doing these steps) but this is optional. The image URL is buried within the code.
If you are familiar with HTML, you can grab it from the image source:
img style="..." src="THISISTHEIMAGEURLYOUWANT.gif"
If not, click on the “Preview” button at the top right hand corner of the post area.

Step 6
If you had clicked “Preview” in the previous step, you will see your actual image in the post.
To copy the image URL, you Right-Click (in Windows) or Ctrl-Click(in Mac) to bring out the contextual menu.
If you’re using Firefox, select “Copy Image Location”. If you’re using Internet Explorer, select “Copy Shortcut”. If you’re using other browsers… your guess is as good as mine.
Paste the code into a Notepad program.

Step 7
Please follow the steps as illustrated below.

Note: If you had saved the post containing your badge in Step 5, you will have a Draft post in your Edit Posts page on Blogger. That’s okay, this will not affect the quality of your life in any way.
Did you know?
When you upload an image through Blogger, it is stored on Picasa Web Albums. This can be accessed using the same account that you use for logging in to Blogger.

