Tutorial: Photos with Rounded Corners using Photoshop
Round/rounded, curved/smooth corner, there are many names for this effect and there are a few methods to create it. In this tutorial, I’m gonna teach you how to get your photos to have rounded corners using what I consider the easiest and most flexible method – using clipping masks.
There are 7 images in this tutorial (totaling 320kb), not including the header image above .
Tutorial: Creating Dotted Shapes Using Photoshop

I have to admit, I don’t usually create my dotted or dashed lines in Photoshop, I do them in Illustrator because it gives me more control over strokes. But fret not, you can create nice dotted shapes in Photoshop too. Today we’re gonna learn how to create dotted shapes. You can apply this method to any shape. In today’s example, I’ll walk you through the steps in creating a dotted circle. There are 5 images in this tutorial (not including the example above)
Have you created a dotted brush? If not, please follow the Creating Dotted Lines Using Photoshop tutorial. Additionally, you may want to learn how to create Colourful Dotted Lines. Please have the correct brush and colours selected before proceeding with this tutorial.
NaBloPoMo Badges – April 2008
Although I am not on the blogroll for April (the theme is “Letters”), I have made some badges for the month anyway!
Download away!
![]()
![]()
![]()
![]()
![]()
![]()
![]()
![]()
![]()
![]()
![]()
![]()
![]()
![]()
![]()
Note:
Feel free to use them on your blog but please download and save them to your server first (do not hotlink from this website). If you’ve used these badges, do link back to NaBloPoMo website, I’m sure Eden will appreciate it. See instructions and other badges at the NaBloPoMo site.
You don’t have to link back to me (although I’d greatly appreciate it ♥) but I’d love to see these being used on your blog, so drop me a comment if you do, and I’ll pay your site a visit. :)
Tutorials
Adding Badges using Blogger
Adding Badges using WordPress
Tutorial: Colourful Dotted Lines in Photoshop
Previously, we learnt how to customise a brush to create dotted lines in Adobe Photoshop. Today I’ll show you a how to customise your brush further to create multi-coloured dotted lines.
Create a dotted brush or select a dotted brush you’ve saved earlier from the Tool Preset.
On your Brush Palette, check the Color Dynamics box (Giant Cursor 1).
Then set the Foreground/Background Jitter to 100% (Giant Cursor 2).
Lower values will result in the foreground colour being used more than the background colour.
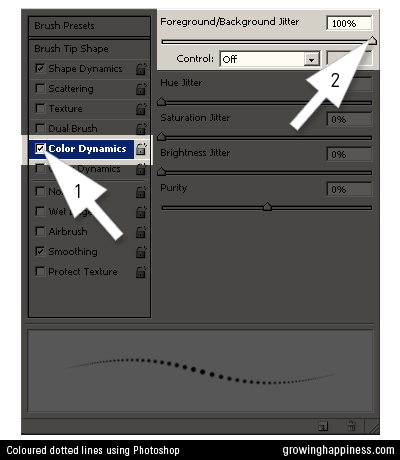
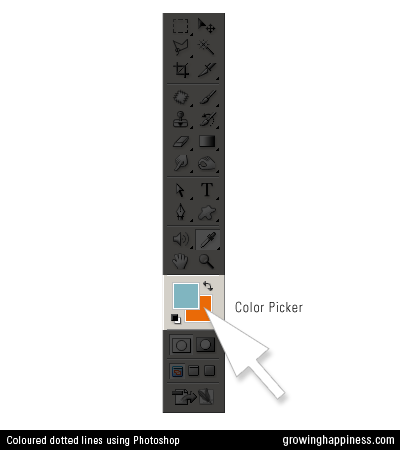
Use the color picker to select two contrasting colors.
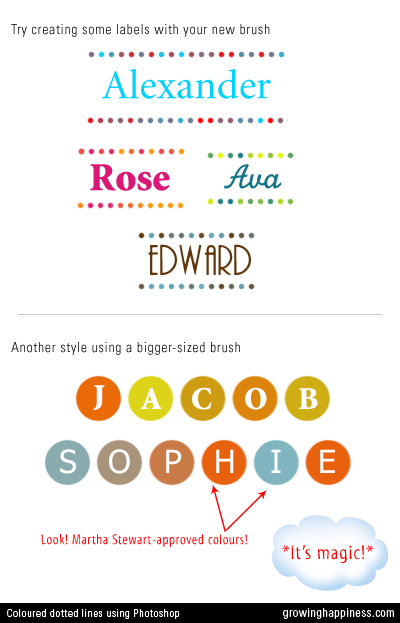
Try placing letters over bigger brushes for a different look.
The dots work nicely for name labels and scrapbooking.
Here are examples using names from my Favourite Names List.
Tutorial: Creating Dotted Lines Using Photoshop
In this tutorial, we’ll learn how to customize a brush in Adobe® Photoshop® to create dotted lines.
There are a total of 8 images (about 150kb), not including the masthead, in this tutorial.
Step 1
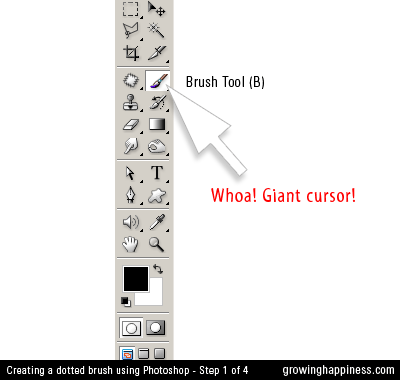
Select the Brush tool from your tools palette, alternatively, just type “B” on your keyboard.
If the tools palette is not visible, go to the menubar and click Window > Tools.
Tutorial: Adding Badges Using WordPress
If you use WordPress for blogging, this tutorial will guide you in adding a badge (or any image in general) for NaBloPoMo to your sidebar.
Q. How do you add an image to the sidebar in WordPress?
A. By adding a Text widget. (I know, how counter-intuitive!)
Before that
Have you uploaded the image to your server? If you haven’t, please follow this tutorial.
Step 1
Go to “Presentation” > “Widgets” page.
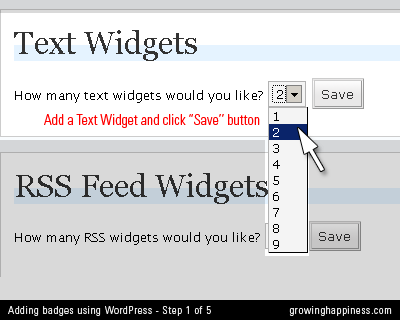
Find the “Text Widgets” widgets section (somewhere near the bottom of the page).
Q. How many text widgets would you like?
If you have “1″ by default, you will need another one to add your image, so select “2″. If you already have 2 Text Widgets in your Sidebar, select “3″ and so on.
Click the “Save” button.
Step 2
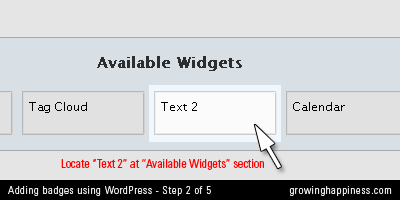
Locate your “Text 2″ widget in the “Available Widgets” section (typically at the middle of the page, below the “Sidebar” section).
Please note the number will correspond to what you’ve selected in the previous step, i.e. if you’ve selected 3 Text Widgets in Step 1, then find a “Text 3″ widget in this step. For simplicity, I’ll just refer to it as “Text 2″ from now on.
Step 3
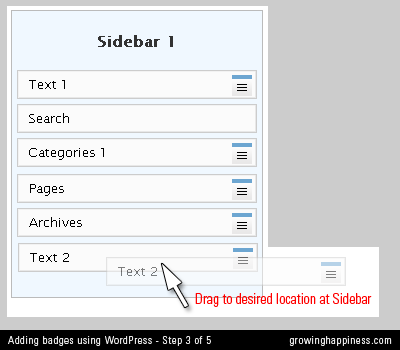
Drag the “Text 2″ widget from the “Available Widgets” section to the “Sidebar” section(you may have more than 1 Sidebar so be sure to drag to the correct one).
Move it to the desired location within the Sidebar (top, middle, bottom) by dragging it.
Step 4
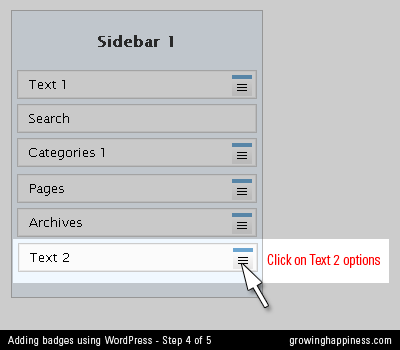
Click on the blue list icon on the right of your text widget to bring up the text options box.
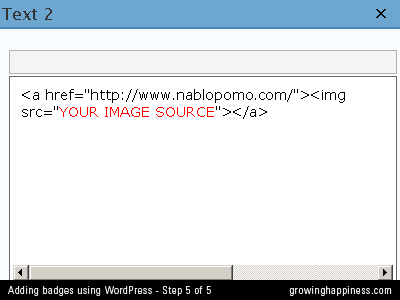
Step 5
A Text options box will appear in the middle of the screen.
The single-line field at the top is where you add a title for this widget, e.g. “My Badges”. This is optional.
Assuming you’ve uploaded the image to your own server, add the code to the text field as follows, replacing YOURIMAGESOURCE with the actual URL of your image on your server. Your image URL may look something like this:
http://www.yoururl.com/images/YOURIMAGE.gif
In which case your full code, with a link to NaBloPoMo page will look like this:
"http://www.yoururl.com/images/YOURIMAGE.gif"/>
Click “Save”. If you’ve done all the steps correctly, you will now have the badge on your sidebar.
Did you know?
You can download a variety of NaBloPoMo badges or buttons from this page?
Go do it now, because they are the cutest on the web, even if I do shamelessly claim so myself.

