Tutorial: Adding Badges Using WordPress
If you use WordPress for blogging, this tutorial will guide you in adding a badge (or any image in general) for NaBloPoMo to your sidebar.
Q. How do you add an image to the sidebar in WordPress?
A. By adding a Text widget. (I know, how counter-intuitive!)
Before that
Have you uploaded the image to your server? If you haven’t, please follow this tutorial.
Step 1
Go to “Presentation” > “Widgets” page.
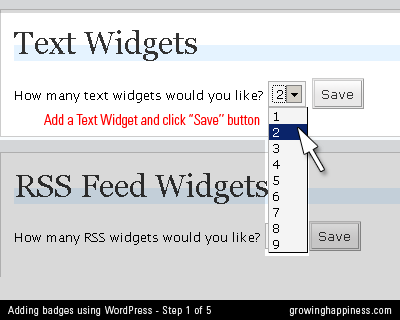
Find the “Text Widgets” widgets section (somewhere near the bottom of the page).
Q. How many text widgets would you like?
If you have “1″ by default, you will need another one to add your image, so select “2″. If you already have 2 Text Widgets in your Sidebar, select “3″ and so on.
Click the “Save” button.
Step 2
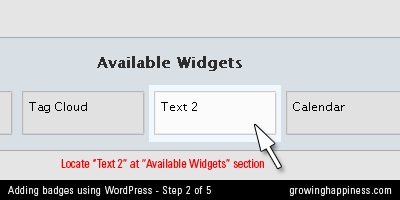
Locate your “Text 2″ widget in the “Available Widgets” section (typically at the middle of the page, below the “Sidebar” section).
Please note the number will correspond to what you’ve selected in the previous step, i.e. if you’ve selected 3 Text Widgets in Step 1, then find a “Text 3″ widget in this step. For simplicity, I’ll just refer to it as “Text 2″ from now on.
Step 3
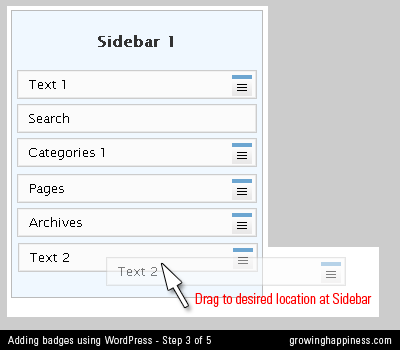
Drag the “Text 2″ widget from the “Available Widgets” section to the “Sidebar” section(you may have more than 1 Sidebar so be sure to drag to the correct one).
Move it to the desired location within the Sidebar (top, middle, bottom) by dragging it.
Step 4
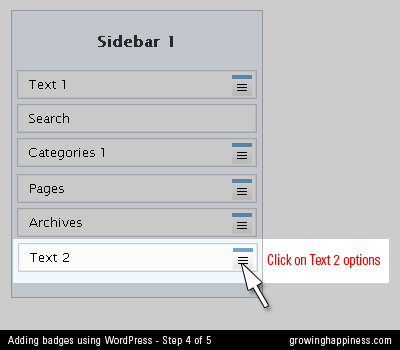
Click on the blue list icon on the right of your text widget to bring up the text options box.
Step 5
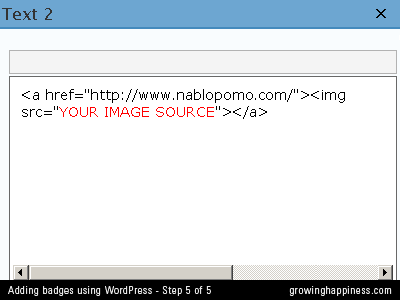
A Text options box will appear in the middle of the screen.
The single-line field at the top is where you add a title for this widget, e.g. “My Badges”. This is optional.
Assuming you’ve uploaded the image to your own server, add the code to the text field as follows, replacing YOURIMAGESOURCE with the actual URL of your image on your server. Your image URL may look something like this:
http://www.yoururl.com/images/YOURIMAGE.gif
In which case your full code, with a link to NaBloPoMo page will look like this:
"http://www.yoururl.com/images/YOURIMAGE.gif"/>
Click “Save”. If you’ve done all the steps correctly, you will now have the badge on your sidebar.
Did you know?
You can download a variety of NaBloPoMo badges or buttons from this page?
Go do it now, because they are the cutest on the web, even if I do shamelessly claim so myself.
Tutorial: Uploading Images Using WordPress
If you plan to put a badge to your sidebar, you may need to follow through these steps first to get your image URL.
Step 1
Go to a Write Page or Write Post page.
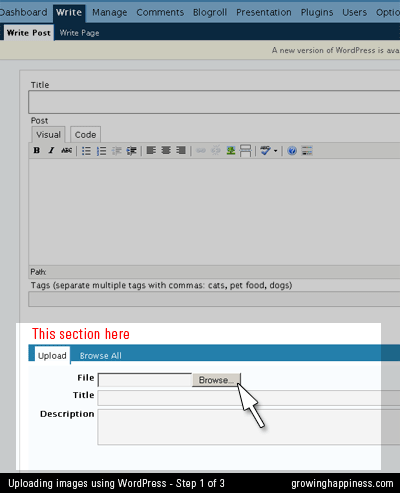
Locate the “Upload” section below.
Select the saved image from your computer, give it a title and description if you want, and click the “Upload” button.
Step 2
(Usually, if you want to use the image you’ve just uploaded in a post that you’re writing, you’d click “Send to Editor”. In this tutorial, I’m showing you how to get the image URL so that you can use it on your sidebar)
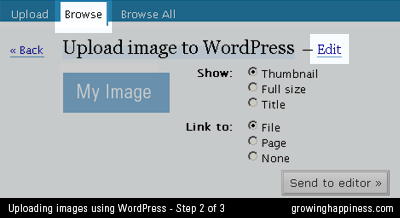
Go to the “Browse” mode, click on “Edit”.
Alternatively click “Browse All”, select the image you want to use, and then click on “Edit”.
Step 3
Copy your image URL from the URL field. Paste it in a Notepad program so that you can use it later.
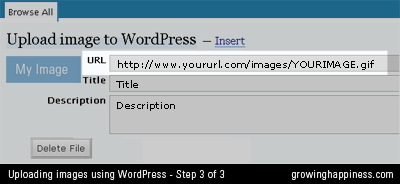
Now you can proceed to use this image in your sidebar by following this tutorial.
Remember you can download a badge from this page.
Tutorial: Adding Badges to the Sidebar Using WordPress
If you use WordPress for blogging, this tutorial will show you how to add a badge (or any image in general) for NaBloPoMo to your sidebar.
Q. How do you add an image to the sidebar in WordPress?
A. By adding a Text widget. (I know, how counter-intuitive!)
More
NaBloPoMo March 2008 badges
Adding badges using Blogger
Uploading images using WordPress
31 Days of Lists – I Have A Plan
How do you keep to posting a list a day without running out of things to talk about or worse, ending up feeling like you’re doing a chore? Would you write down your grocery list every other day?
Well, for a start, you’ll need quite a bit of discipline. But I think, with proper planning, even the most commitment-phobic blogger can accomplish this task without resorting to listing mundane things for the sake of posting something. Creating a post a day for 31 days and sticking to a theme will seem less daunting if you have planned your posts ahead.
Remember micromovements? 1 whole month sounds like a very long time but how does 1 week sound like? Much more manageable, yes? If I divide my 1 month into 4 weeks, I only need to concentrate on writing for the next 7 days. And if I have a different theme each week, I only need to concentrate on one topic of interest per week. The advantage of doing this is that it helps me focus, generates anticipation for the reader and eliminate the need to post something, ANYTHING, just because I have to.
So, where do I start? Why, by creating a list of things to list for the next 30 days of course! Here’s my plan for March:
The Masterplan
1 The First List aka The Masterplan (you’re reading it)
2 Random SundayWeek 1 – Theme 1
3 New Monday
4 Desert Island Tuesday
5 Wednesday Websites
6 Trivia Thursday
7 TGIF
8 Saturday Summary
9 Random SundayWeek 2 – Theme 2
10-14 Themed Lists
15 Week 2 Recap
16 Random SundayWeek 3 – Theme 3
17-21 Themed Lists
22 Week 3 Recap
23 Random SundayWeek 4 – Theme 4
24-28 Themed Lists
29 Week 4 Recap
30 Random sunday31 The Last List
I plan to further divide the days of the weeks into their own themes:
on Mondays, I’ll try something new;
Tuesdays’ lists are inspired by Desert Island Discs;
on Wednesdays you’ll get to see a list of websites I love;
Thursdays are for trivia and
on Fridays, I’ll list the things I’m thankful for.
I’m leaving my weekends open for random things because the last thing I want to do on a weekend is think. I’ll be announcing my theme for the week on Sundays and will do a recap on Saturdays.
A final note – the above is just a guide. I wouldn’t be too upset if I don’t manage to stick to it religiously. The most important thing for me (and you) is to have fun! Have a good March, everyone!
Related Links
National Blog Posting Month
SARK Micromovement
Related Posts
Inspiration: SARK
Desktop Cleanup

Tablet Do’s and Don’ts
As you’d remember, my table is now clean and tidy. But since I have only a tiny space to put my things on (the cat is still occupying a good half of the desk), I tend to place my folder on top of my Wacom tablet. I’d usually move the folder away when I need to use the tablet.
You know what? I just discovered that I can use my tablet with the folder full of paper on top of it! How great is that? How can I not know this before? I’ve used a tablet while working in another company years ago and the most I did was to trace a thin sheet of paper with my sketch on.
I tried piling different things on top of the tablet to see how much it can take before losing sensitivity. Results vary with different material. It can safely take up to 1.5cm of copy paper. One CD case if fine, but not two. It didn’t work over a sachet of instant coffee. It worked up to page 328 of W magazine (the one with Scarlett Johansson and Natalie Portman on the cover). It even worked over a box of chocolates! What else is there to try?
Naturally I thought of experimenting on things more… desk-related…like…the cat. Yes the one that’s always sleeping on my desk (not Moo Moo, she’d be stealing my stylus if I were to try that).
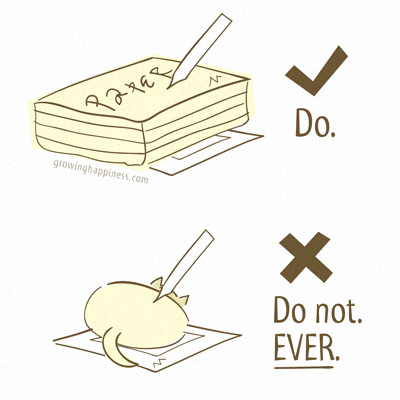
Result? Apparently cats are allowed to take up any amount of space they desire, but one should never, ever attempt to poke a sleeping cat with a stylus.
Tutorial : Adding Badges Using Blogger
Adding images using Blogger can be confusing, even for someone like me so here’s a little tutorial.
Before that
Get your NaBloPoMo badges here
Step 1
Go to your Blogger Dashboard and click on “New Post”.

Step 2
At the Create Posting screen, click on the “Add Image” button, represented by an icon of a landscape (at least I think that’s what it is).

Step 3
Assuming you have saved the badge of choice on your computer, click on the “Browse…” button, locate the saved image on your PC. The file location should be reflected in the text area beside the button once you’ve selected the image.
Then click on the “Upload Image” button. (You will see a Loading page while the image is being uploaded)

Step 4
When upload is complete, you will be presented with a screen saying that “Your image has been added”.
Click “Done” and this window will close.

Step 5
Back at the “Create Posting” page, you will see a chunk of code generated by Blogger. You can title this post and save if you want (just in case you accidentally delete the code in the process of doing these steps) but this is optional. The image URL is buried within the code.
If you are familiar with HTML, you can grab it from the image source:
img style="..." src="THISISTHEIMAGEURLYOUWANT.gif"
If not, click on the “Preview” button at the top right hand corner of the post area.

Step 6
If you had clicked “Preview” in the previous step, you will see your actual image in the post.
To copy the image URL, you Right-Click (in Windows) or Ctrl-Click(in Mac) to bring out the contextual menu.
If you’re using Firefox, select “Copy Image Location”. If you’re using Internet Explorer, select “Copy Shortcut”. If you’re using other browsers… your guess is as good as mine.
Paste the code into a Notepad program.

Step 7
Please follow the steps as illustrated below.

Note: If you had saved the post containing your badge in Step 5, you will have a Draft post in your Edit Posts page on Blogger. That’s okay, this will not affect the quality of your life in any way.
Did you know?
When you upload an image through Blogger, it is stored on Picasa Web Albums. This can be accessed using the same account that you use for logging in to Blogger.

