Tutorial: Photos with Rounded Corners using Photoshop

Round/rounded, curved/smooth corner, there are many names for this effect and there are a few methods to create it. In this tutorial, I’m gonna teach you how to get your photos to have rounded corners using what I consider the easiest and most flexible method – using clipping masks.
There are 7 images in this tutorial (totaling 320kb), not including the header image above .
Open the image file you’d like to use (make sure you have a backup copy, just in case) and resize it to desired size using the Image>Image Size… from your menu bar. In this tutorial, I’m using an image that is 350px wide. I am using Photoshop CS2.
Step 1
Your image is by default a Background layer, which is locked. To unlock it, double click the layer. At the “New Layer” dialog box, you may choose to rename the layer, in this example, “Spring”, or leave it as “Layer 0″, and click OK.

Step 2
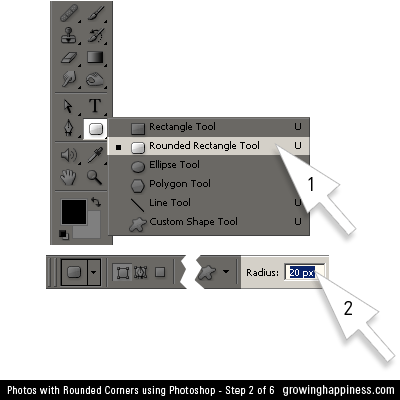
Click-hold the Shape Tool on your tools palette and select Rounded Rectangle Tool. If the tools palette is not visible, go to the menubar and click Window > Tools.
At your Shape options bar, enter a Radius of 20px (you can experiment with different values later).
Step 3
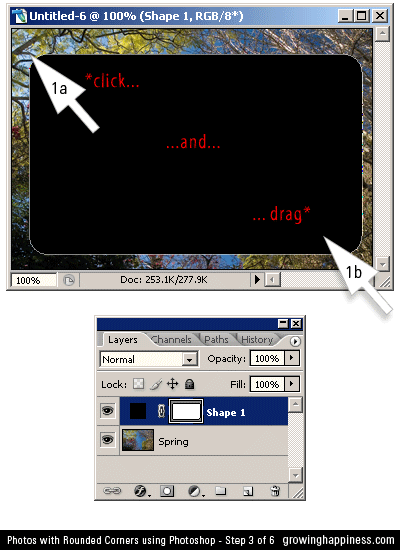
Click and drag a Rounded Rectangle Shape over your photo. Note that the actual cursor is a hairline cross, not a Giant Arrow. A Shape 1 layer is automatically created above your photo layer. Move the shape around until you are roughly satisfied with the positioning.
Step 4
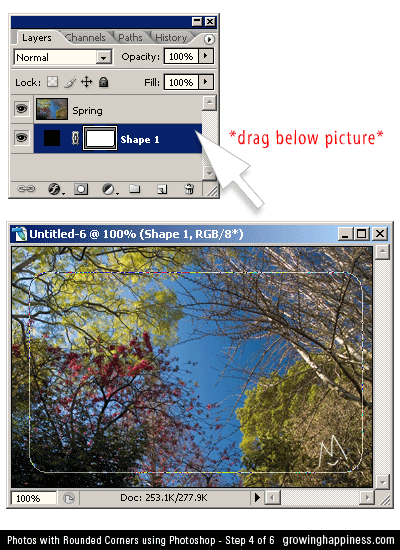
Drag the Shape 1 layer below your photo layer. An outline of the shape will be visible on your photo layer.
Step 5
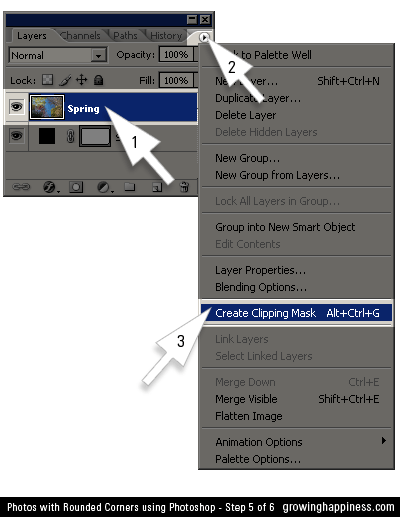
Select the photo layer (Important:Make sure you have the photo layer selected before moving to the next step!).
Click on the little arrow at the top right corner, then click on Create Clipping Mask.
Voila! Your photo layer is now masked to the shape layer below. At this point, you can select the Shape layer and move it around or transform its size, if you like.
Step 6
Before saving this image, you might want to crop away the unecessary transparent pixels surrounding your photo. From your menu bar, go to Image>Trim…
Copy the options below. The file will be cropped exactly to the edge of your photo.
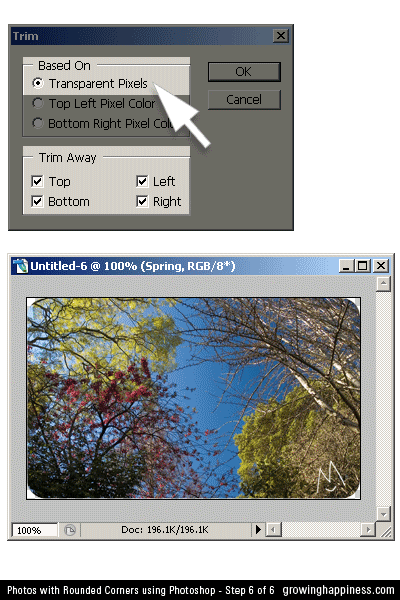
Remember to save the file as GIF or PNG with Transparency option checked. If you save it as a JPG, the white border will show when used on top of another image/web page color that is not white.
Have fun!

Related Posts:

Ginger M at 11:38 am on April 23, 2008
Damien Riley at 10:26 am on April 29, 2008
han at 3:22 pm on July 23, 2008
Alexa at 11:06 pm on July 31, 2008
Ginger M at 12:07 am on August 1, 2008
gladbeast at 5:46 am on August 4, 2008
gladbeast at 5:54 am on August 4, 2008
Steve M at 4:22 am on September 26, 2008
Richard Palasoff at 2:20 pm on December 27, 2008
Ginger M at 11:28 am on December 29, 2008
Shane at 5:30 pm on March 29, 2009
12+ Excellent Photoshop Rounded Corners Tutorials at 9:02 am on April 3, 2009
T. Leach at 6:11 pm on May 3, 2009
Michael at 11:05 am on June 14, 2009
Noble One at 9:20 am on July 15, 2009
Carol at 11:53 am on February 16, 2010
Kashif at 11:10 pm on February 25, 2010
Lisa at 2:29 pm on April 13, 2010
Ginger M at 2:08 am on April 16, 2010
Rosa at 7:27 am on April 19, 2010
Randi at 11:21 pm on June 14, 2010
Cody at 9:32 am on October 6, 2010
Pascal Diamond at 4:02 am on December 8, 2010
Ginger M at 3:58 pm on December 12, 2010
Kimmy at 10:20 pm on February 25, 2011
Flightless Bird (Week Six of Fifty-Two) | BirdWatchers at 10:06 pm on April 11, 2011
Nami @ Just One Cookbook at 2:05 am on May 27, 2011
pictures with rounded edges at 1:57 pm on June 2, 2011
betsy at 3:06 pm on August 26, 2011
Dedicated -Ash at 6:39 am on August 30, 2011
Some guy at 5:26 am on September 2, 2011
Ron Richardson at 12:03 pm on October 31, 2011
Natasha at 11:04 am on January 2, 2012
Shaun at 8:17 pm on February 3, 2012
Jim Heilman at 8:47 pm on February 9, 2012
Anthony Katz at 2:24 pm on February 23, 2012
priscilla at 3:37 pm on September 24, 2012
sha at 7:59 pm on October 25, 2012



Zech at 11:17 am on April 23, 2008