April 2nd, 2008

Tutorial: Creating Dotted Shapes Using Photoshop

Dotted A
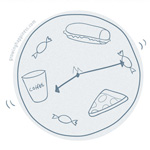
I have to admit, I don’t usually create my dotted or dashed lines in Photoshop, I do them in Illustrator because it gives me more control over strokes. But fret not, you can create nice dotted shapes in Photoshop too. Today we’re gonna learn how to create dotted shapes. You can apply this method to any shape. In today’s example, I’ll walk you through the steps in creating a dotted circle. There are 5 images in this tutorial (not including the example above)

Before that…
Have you created a dotted brush? If not, please follow the Creating Dotted Lines Using Photoshop tutorial. Additionally, you may want to learn how to create Colourful Dotted Lines. Please have the correct brush and colours selected before proceeding with this tutorial.


Step 1
Locate the Shape Tool on your tools palette. The default shown is usually Rectangle, but it can be either one of these: Rounded Rectangle, Ellipse, Polygon, Line or Custom Shape. Alternatively, just type “U” on your keyboard.
If the tools palette is not visible, go to the menubar and click Window > Tools.
Creating Dotted Circle 1

Step 2
On your Shape options panel, click on the Paths icon (Giant Cursor 1) and then click on the Ellipse Tool icon (Giant Cursor 2).
If you can’t see your Shape options, go to the menubar and click Window > Options.

Creating Dotted Circle 2

Step 3
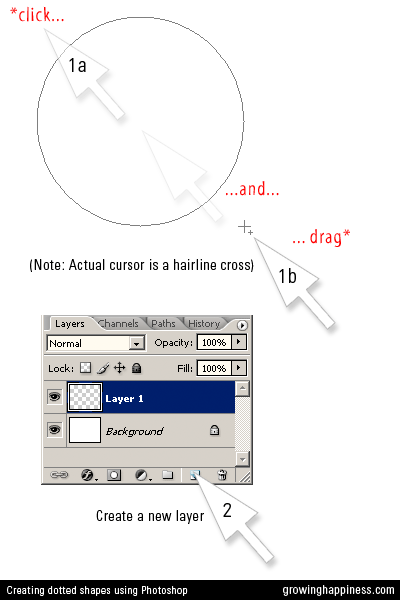
Create a new file and click and drag a circle on to your canvas using the currently selected Path + Ellipse Tool. (Note that your cursor is a small hairline cross, not a Giant Arrow as illustrated here)

After that, create a new layer. If you don’t see your Layers panel, go to Window > Layers. This step is crucial – if you didn’t create a new layer, your working layer will be the Background layer, which, by default, is locked, therefore preventing you from continuing with the next step. You can give the layer a meaningful name e.g. Circle, if you want.
Creating Dotted Circle 3

Step 4
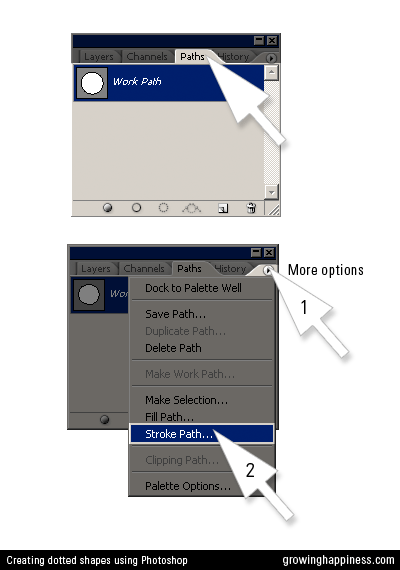
Go to the Paths options palette. If this is not visible, click Window > Paths.
Your Work Path should already be selected (highlighted in blue in this example).

Important: Before proceeding to the next step, please make sure you already have your dotted the brush and correct colors selected. (See Before That… section at the top of this post)

Click on the little arrow at the top right corner to bring out more path options and then click Stroke Path…
Click OK at the dialog box.
Creating Dotted Circle 4

Step 5
Your circle will look something like Fig. 1.
Click below the Work Path so that it is no longer selected.
Admire your work.
Creating Dotted Circle 5

Try experimenting with other shapes too. Have fun!


Related Posts:
| More
File in: tips, tutorials Tags: , , ,
Comments: 18 Comments | Add your comment
[...] Finally after hours and hours of searching, I found how to do it here. [...]
#194 « Lisa_4.8  at 12:38 am on August 3, 2008
Hi M, Thank you for sharing your knowledge and gift with us. I am currently designing my Logo for my photography business and was looking for something like this which I will design and use. Have a great weekend J
Jason  at 3:14 am on October 2, 2009
Superb tutorials, simple and clear, you are making my life much easier. Thank you very much for your time and hard work preparing them.
Graple  at 6:05 am on December 2, 2009
Thank you! I looked everywhere and couldn't believe how hard it was to find instructions. This made it so easy. One question though - how in the world did you do the multi-colored dotted circles? Did you change the color of each dot manually after you created the circle or is there an easier way?
Cyndi D.  at 11:55 pm on January 8, 2010
I've shown how to create colorful dotted lines in this tutorial. Just make sure you have that brush selected and colors chosen before proceeding with the above steps.
Ginger M  at 1:25 am on January 9, 2010
[...] to accomplish… (Okay, so I did cave and ask him for help!  But I ended up figuring out with a little help from designer/illustrator Marlina who blogs over at Lovely Room, not from [...]
Annie at Home » Blog Archive » {Ding! Dong!} Christmas Card  at 5:01 pm on January 12, 2010
Thanks for this. It was all film when I started in photography, and I've had a steep learning curve! I knew there had to be a simple way to do this, but hadn't found a tutorial... until now. Really appreciate your generosity with your PS knowledge.
Jennifer  at 5:48 am on March 26, 2010
What a great tutorial! Will this work in Elements do you know?
Keely  at 11:26 am on June 27, 2010
so how do i move the dotted circle once i make it? if i don't make it the proper size & in the proper place it doesn't move for me. help!
Lisa  at 10:43 pm on July 1, 2010
Thank you very much for posting this incredibly easy to follow tutorial. I am not very proficient in photoshop, and I really wanted to learn to make dotted circles. You are very generous.
lisaa  at 4:27 pm on July 19, 2010
Yay! Thank you! I have been trying to figure this out for a while now, and I can't believe how easy you made it! Thanks again.
Becki  at 11:09 pm on November 30, 2010
Thank you!! I looked on SO many different sites, and I could not figure out how to do it until your tutorial!
Angela  at 11:33 am on January 31, 2011
My dots seem to be cut in half, i.e., the half dot is on the inside of the circle. Can you tell me what I'm doing wrong?
Kari  at 4:18 pm on July 6, 2011
Thankyou for this great tutorial! I did it and it's wonderful but can you help me work out why my dotted line fades out near the tip of the circle?
Sam  at 12:29 am on October 21, 2011
I have CS5 and was wondering how to find the working path there? anyone know?
Alanna  at 9:04 am on February 17, 2012
Thank you for this tutorial! :)
David  at 10:13 am on April 18, 2012
thank you very much! i needed this! :)
gigsy  at 9:18 am on January 11, 2013

Add Comment


*Required. Email will not be published.