Tutorial: Adding Badges Using WordPress
If you use WordPress for blogging, this tutorial will guide you in adding a badge (or any image in general) for NaBloPoMo to your sidebar.
Q. How do you add an image to the sidebar in WordPress?
A. By adding a Text widget. (I know, how counter-intuitive!)
Before that
Have you uploaded the image to your server? If you haven’t, please follow this tutorial.
Step 1
Go to “Presentation” > “Widgets” page.
Find the “Text Widgets” widgets section (somewhere near the bottom of the page).
Q. How many text widgets would you like?
If you have “1″ by default, you will need another one to add your image, so select “2″. If you already have 2 Text Widgets in your Sidebar, select “3″ and so on.
Click the “Save” button.
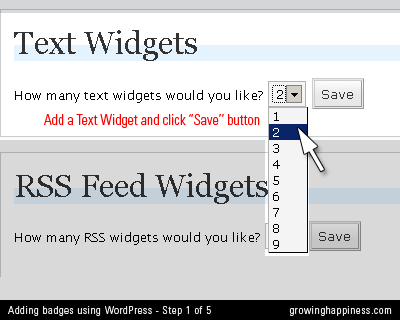
Step 2
Locate your “Text 2″ widget in the “Available Widgets” section (typically at the middle of the page, below the “Sidebar” section).
Please note the number will correspond to what you’ve selected in the previous step, i.e. if you’ve selected 3 Text Widgets in Step 1, then find a “Text 3″ widget in this step. For simplicity, I’ll just refer to it as “Text 2″ from now on.
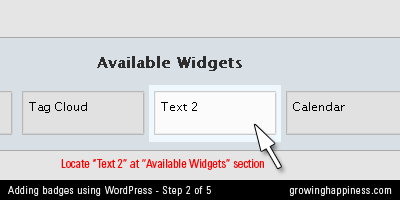
Step 3
Drag the “Text 2″ widget from the “Available Widgets” section to the “Sidebar” section(you may have more than 1 Sidebar so be sure to drag to the correct one).
Move it to the desired location within the Sidebar (top, middle, bottom) by dragging it.
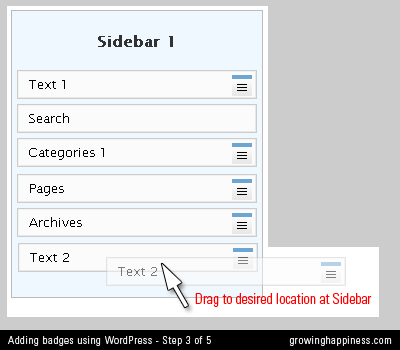
Step 4
Click on the blue list icon on the right of your text widget to bring up the text options box.
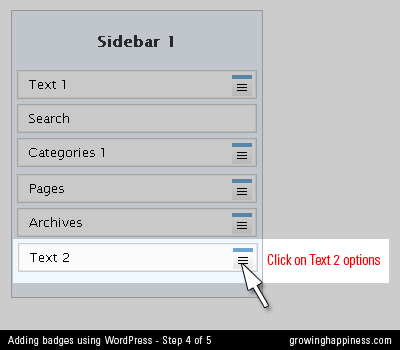
Step 5
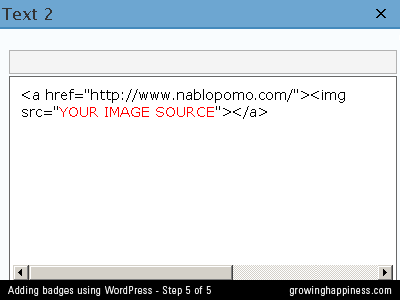
A Text options box will appear in the middle of the screen.
The single-line field at the top is where you add a title for this widget, e.g. “My Badges”. This is optional.
Assuming you’ve uploaded the image to your own server, add the code to the text field as follows, replacing YOURIMAGESOURCE with the actual URL of your image on your server. Your image URL may look something like this:
http://www.yoururl.com/images/YOURIMAGE.gif
In which case your full code, with a link to NaBloPoMo page will look like this:
"http://www.yoururl.com/images/YOURIMAGE.gif"/>
Click “Save”. If you’ve done all the steps correctly, you will now have the badge on your sidebar.
Did you know?
You can download a variety of NaBloPoMo badges or buttons from this page?
Go do it now, because they are the cutest on the web, even if I do shamelessly claim so myself.
Related Posts:

Tutorial: Uploading Images Using WordPress | Growing Happiness at 6:07 am on April 1, 2008
My Blog Traffic Generation Story — Techniques I Used to Generate and Increase Web Traffic | Growing Happiness at 1:10 am on May 29, 2008





NaBloPoMo Badges - April 2008 | Growing Happiness at 5:59 am on April 1, 2008